No products in the basket.

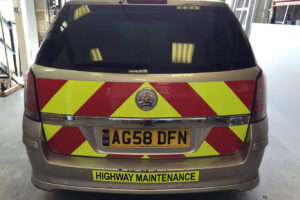
To remove chevrons from a van safely, first identify the marking material, inspect the paintwork and obtain the relevant removal instructions. Self-adhesive chevrons can often be removed, but nobody should promise damage-free removal without considering the condition of the vehicle and the product fitted.
The important decision comes before you start pulling at an edge. A kit on sound original paintwork presents a different situation from markings covering a repaired, resprayed or deteriorating panel.
Whether you’re replacing damaged chevrons, updating a fleet or preparing a van for sale, a careful assessment helps you decide whether removal is manageable or better left to a vehicle graphics specialist.
Yes. Removing adhesive markings can lift weak paint, expose existing defects or leave a finish that needs further attention.
Paint condition matters because the adhesive may hold more strongly than a damaged coating holds to the panel beneath it. Previously repaired areas, touch-up paint, chips and failing clear coat deserve particular attention.
Avery Dennison’s vehicle graphics guidance identifies aftermarket paint and existing paint damage as potential risk factors during graphic removal. A vehicle that looks tidy from a distance may still have vulnerable areas beneath its markings. Graphics
For example, a fleet van might have had one rear door replaced and resprayed after an accident. Although both doors carry matching chevrons, their paint histories differ. It would be unwise to assume they will respond identically during removal.
Photograph the rear panels before work starts. Record visible chips, corrosion, repairs and lifting paint so that the starting condition is clear.
Start by establishing what is actually attached to the vehicle.
All About Chevrons supplies both self-adhesive and magnetic kits. Its fully assembled kits have the red and yellow sections already positioned together, but the mounting method still determines how the markings should be handled. All About Chevrons
A magnetic panel requires its own care procedure. It should not be treated as adhesive vinyl simply because it carries the same chevron pattern.
For self-adhesive markings, try to find:
If the product is unknown, ask the original supplier before choosing a removal method. Instructions for one reflective film should not automatically be applied to another.
Also establish what happens after removal. A van being sold needs a different handover plan from one returning to roadside duties with replacement markings.
Use heat only where the material manufacturer’s instructions recommend it, and follow the specified method.
There is no single temperature, tool setting or peeling technique suitable for every chevron kit and vehicle surface. The reflective film, adhesive, paint system and surrounding components all need consideration.
Avoid taking a generic online instruction such as “heat it until it peels” as sufficient guidance. It gives no reliable limit and says nothing about the material fitted to your van.
If the instructions require controlled heating and you don’t have suitable equipment or experience, arrange specialist removal. Increasing the heat or pulling harder when the marking resists is a poor substitute for identifying why it isn’t releasing.
The same principle applies to tools. Don’t improvise with a metal scraper or cut directly against painted bodywork to create an edge.
Where the product instructions allow owner removal, begin with a small, accessible area and assess the result before committing to an entire door.
The test should help answer three practical questions:
A successful test is useful evidence, but it doesn’t guarantee that every panel will behave the same way. Take extra care where the markings cross repaired areas or changes in surface.
Stop if paint starts lifting, the coating changes appearance or the material repeatedly breaks into small fragments. Those results justify reassessing the method rather than continuing across a larger area.
For a fleet manager, this is also a useful scheduling point. Establish how the first vehicle responds before booking several vans into the same removal window.
Treat adhesive removal as a separate stage.
A product suitable for removing residue from one surface may be unsuitable for another. Choose a cleaner approved for both the adhesive and the vehicle finish, follow its instructions and test it in an inconspicuous area.
Use the stated protective equipment and ventilation arrangements. Don’t assume that a strong household solvent or a product intended for bare metal is appropriate for painted rear doors.
Manufacturer guidance also makes clear that adhesive residue needs to be removed before replacement markings are applied. For example, 3M includes adhesive removal and subsequent surface cleaning within its reflective marking removal procedure. That procedure relates to its specified products, rather than providing universal instructions for every chevron film. 3M US
Once the adhesive is removed, inspect the finish again. A mark that remains should be assessed before further rubbing, scraping or chemical treatment. More aggressive cleaning is not automatically the right answer.
A vehicle graphics specialist is a sensible option when the material is unknown, the paintwork is questionable or an initial test gives poor results.
Professional assessment is particularly useful where:
Ask what the proposed work includes. Removing the visible film, removing adhesive and assessing the exposed paintwork are separate tasks, even when they form part of one quotation.
Provide photographs and disclose known repairs. Clear information helps the specialist assess the job and explain any limitations before starting.
All About Chevrons is a supplier of vehicle markings. When discussing an existing kit, distinguish product advice from any separately arranged removal or bodywork services.
Use removal as an opportunity to check the vehicle details and available rear surfaces again.
A replacement kit should match the actual make, model, year and rear-door configuration. Changes such as replacement doors, windows, cameras or other fittings may affect the layout.
All About Chevrons supplies vehicle-specific kits and warns that magnetic markings won’t attach to unsuitable aluminium, plastic or composite panels. Switching from adhesive to magnetic chevrons therefore requires a panel compatibility check. All About Chevrons
If replacement markings are needed, discuss suitable chevron kits before starting removal. That helps you organise the work around vehicle availability.
For a van returning to road-working duties, make replacement and inspection part of the same maintenance plan. Don’t assume that removing worn markings completes the job.
Don’t assume so. A materials warranty and a promise about removal from vehicle paintwork are different things. Check the actual warranty terms and removal instructions.
Prepare the surface according to the replacement material’s instructions. Residue should be removed rather than used as a base for new markings.
A useful estimate requires an assessment of the fitted material, its condition, the panel finish and the amount of residue. Avoid scheduling several vehicles around an untested estimate.
Before removing existing chevrons:
For help identifying a suitable replacement kit, contact All About Chevrons with your vehicle details and photographs of its rear panels.
Phone: 023 9252 0333
Email: info@allaboutchevrons.com